
Stabilize exposed soil immediately, install perimeter sediment controls on the contour, and document every action in your Stormwater Pollution Prevention Plan (SWP3). Those three steps, executed in that order, are what separate a compliant site from an enforcement notice.
-
Stabilize first. Any area where grading has paused for more than 14 days (or the timeframe your permit specifies) needs temporary seeding, mulch, or an erosion-control blanket before the next rain event.
-
Install perimeter controls. Silt fences, fiber rolls, or compost filter socks go on the contour at the site boundary before earthwork begins, not after the first storm.
-
Document with photos and a signed inspection log. Your SWP3 is only as defensible as the records behind it. Date-stamped photos and a written log are your first line of defense at an inspection.
Two regulatory anchors govern most U.S. construction sites: the EPA Construction General Permit (CGP) under the NPDES program, and your state’s equivalent permit (in Oklahoma, that’s OKR10). This guide focuses primarily on Oklahoma’s OKR10 requirements while also referencing federal EPA guidance.
Pro Tip: Before breaking ground, confirm whether your state permit has a stricter stabilization deadline than the federal CGP. Some states require stabilization within seven days on slopes steeper than 3:1.
Key Takeaways
Effective erosion control for construction sites requires stabilizing soil at the source first, then layering sediment controls as a backup, all documented in a permit-ready SWP3.
| Point | Details |
|---|---|
| Stabilize before the next rain | Apply temporary seeding, mulch, or erosion blankets within your permit’s stabilization window, typically 14 days. |
| Install perimeter controls on the contour | Silt fences and fiber rolls must be installed on the contour at the site boundary before earthwork begins in each phase. |
| Inspect when needed | Inspect at the frequency required by the applicable permit. Under Oklahoma’s OKR10, standard sites generally require inspections every 14 calendar days and following qualifying storm events, with more frequent inspections required for certain high priority sites. |
| Document buffer decisions | 50-foot buffer where required, the SWP3 must explain why and describe compensatory controls. |
| Barnhart Excavating for turnkey work | Barnhart provides earthwork and stabilization for mid-to-large commercial projects. |
Table of Contents
-
What does erosion control on a construction site actually mean?
-
How do you plan for erosion control and meet permit requirements?
-
How does a treatment-train approach sequence your site controls?
-
What do permits actually require, and where do sites commonly fail?
-
What does erosion control cost, and how do you estimate a site budget?
-
When should you hire a specialized erosion-control contractor?
What does erosion control on a construction site actually mean?
Erosion control means preventing soil particles from detaching and moving in the first place. Sediment control is the secondary defense: capturing or filtering particles that have already detached and are moving with runoff. The distinction matters because most permit violations stem from treating them as interchangeable.
Your SWP3 should prioritize erosion controls as the primary defense, with sediment controls as the backup. When you reverse that order, you end up with overwhelmed silt fences and clogged inlets, because no perimeter control is designed to handle the full sediment load from an unstabilized slope.
| Category | Purpose | Typical BMPs | When It’s Primary |
|---|---|---|---|
| Erosion control | Prevent soil detachment at the source | Seeding, mulch, erosion blankets, turf reinforcement mats | During and immediately after grading |
| Sediment control | Capture mobilized particles before discharge | Silt fences, fiber rolls, inlet protection, sediment basins | Continuously, as a backup to erosion controls |
The practical takeaway: design your SWP3 so that erosion-prevention BMPs reduce the sediment load reaching your perimeter controls by as much as possible. Sediment controls then handle what gets through, not the full volume.
How do you plan for erosion control and meet permit requirements?
Build your SWP3 around erosion-first BMPs and a treatment-train sequencing approach. That framing, recommended in EPA’s SWPPP guidance, keeps your permit documentation aligned with how inspectors actually evaluate a site.
SWP3 checklist: what your plan must include
-
Site map showing drainage patterns, discharge points, and BMP locations
-
Stabilization schedule with dates tied to grading phases
-
Identification of responsible parties for installation and maintenance
-
Inspection schedule (As required by the applicable permit)
-
Recordkeeping procedures: signed logs, photo documentation, corrective action tracking
-
Buffer documentation: if a natural buffer of substantial width is infeasible, the SWP3 must explain why and describe the compensatory controls used
Missing buffer documentation is one of the most common inspection findings. Inspectors look for it specifically because the CGP requires it explicitly, and a blank field in the SWP3 reads as noncompliance even when the controls on the ground are adequate.
Permit timelines to build into your schedule:
-
Stabilize disturbed areas promptly after the last land-disturbing activity within the timeframe specified by the permit
-
Install perimeter controls before earthwork begins in each phase
-
Inspect at the frequency required by the applicable permit. Under Oklahoma’s OKR10, standard sites generally require inspections every 14 calendar days and following qualifying storm events, with more frequent inspections required for certain high priority sites.
-
Complete routine repairs immediately; non-routine replacements within the permit’s required window.
Pro Tip: Avoiding common permit submission mistakes early in the process saves significant time during the review cycle.
Documentation standard: Every inspection entry should include the date, inspector name and qualifications, weather conditions, BMP condition ratings, corrective actions identified, and a photo reference number. A signed log that matches your photo timestamps is what holds up at enforcement.
Which erosion-prevention BMPs keep soil in place?
Stabilization through vegetation, blankets, or mulch is the primary control and should be the first measure applied after grading stops. The EPA National Menu of BMPs catalogs these options and recommends combining them in a treatment-train rather than relying on a single product.
| BMP | Best Use | Slope Range | Temporary or Permanent | Notes |
|---|---|---|---|---|
| Temporary seeding | Disturbed areas paused 14+ days | Up to 3:1 | Temporary | Fast germination species; needs follow-up |
| Hydroseeding | Large disturbed areas, rough terrain | Up to 3:1 | Temporary or permanent | Seed, mulch, and tackifier applied together |
| Straw mulch | Flat to moderate slopes | Up to 4:1 | Temporary | Requires crimping or tackifier on slopes |
| Erosion-control blankets | Slopes, channels, disturbed banks | 2:1 to 4:1 | Temporary | Anchor edges; trench and staple per manufacturer |
| Turf reinforcement mats (TRM) | High-velocity channels, steep slopes | Steeper than 2:1 | Permanent | Provides long-term root reinforcement |
| Chemical soil stabilizers | Haul roads, stockpiles, tight schedules | Flat to moderate | Temporary | Reapply after rain; not a substitute for vegetation |
Installation tips that actually matter
Erosion-control blankets fail most often at the edges, not the middle. Trench the upslope edge at least 6 inches into the soil, fold the blanket into the trench, and staple at 12-inch intervals before backfilling. Overlap adjacent rolls by at least 6 inches, with the upslope roll on top. On channels, anchor the blanket at the upstream end before laying it downstream.
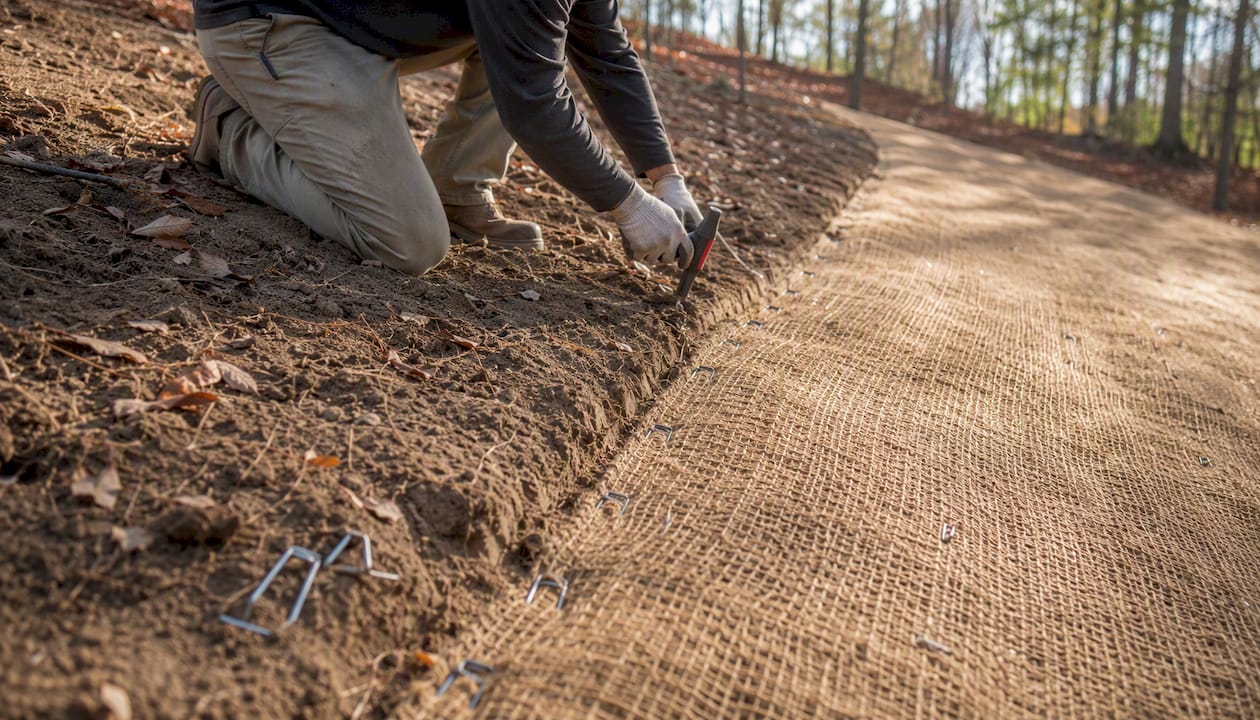
For straw mulch on slopes steeper than 3:1, crimping the straw into the soil surface with a disk or roller is more reliable than tackifier alone. Tackifier degrades after two or three rain events; crimped straw stays put longer.
Pro Tip: When vegetation establishment is delayed by drought, cold, or site conditions, add a secondary layer of sediment control immediately downslope of the seeded area. Don’t wait for the seed to fail before acting.
What sediment-control BMPs capture runoff effectively?
Sediment controls are the secondary line of defense. They should be sized and placed to receive runoff after erosion-prevention BMPs have already reduced the sediment load. Expecting a silt fence to handle raw runoff from a bare, graded slope is asking it to do a job it was never designed for.
Common sediment-control BMPs and their quick-install cues:
-
Silt fence: Install on the contour with the fabric keyed 6 inches into the soil. Posts face upslope. Never run a silt fence up and down a slope, and never use it as a check dam in a concentrated flow channel.
-
Fiber rolls (straw wattles): Space at intervals based on slope steepness; stake through the roll into the soil at 45-degree angles. Straw wattle installation on slopes steeper than 4:1 requires closer spacing and supplemental anchoring.
-
Compost filter socks: Similar placement to fiber rolls but with higher filtration capacity; useful near sensitive water bodies where finer sediment is a concern.
-
Inlet protection: Install before earthwork begins in any phase that drains to a storm inlet. Check after every storm event and clean immediately when sediment reaches half the device’s capacity.
-
Sediment traps and basins: Size based on disturbed drainage area; the CGP provides sediment-basin sizing guidance for sites with 10 or more acres draining to a common point.
-
Stabilized construction exits: Stabilized construction exits should be installed and maintained in accordance with the SWP3, project specifications, and applicable requirements. Inspect daily and replenish when aggregate is displaced or tracked out.
Perimeter controls need crescent-shaped ends turned upslope at the edges so runoff doesn’t flank the control. Outlet protection, typically riprap or a rock check, prevents scour at the low end of any concentrated flow path.
Maintenance threshold: Remove accumulated sediment from perimeter controls before it reaches half the above-ground height of the device. A silt fence with 12 inches of exposed fabric needs cleaning before sediment reaches 6 inches. Waiting longer reduces effectiveness and can cause the control to fail structurally during the next storm.
How does a treatment-train approach sequence your site controls?
Use a treatment-train: stabilize surfaces first, slow and divert runoff second, then capture and settle what remains. The EPA National Menu recommends combining multiple BMPs in this layered sequence because no single control handles the full range of conditions a site produces.
Trace runoff from a typical cut slope to understand how the sequence works in practice. Rain hits a graded slope. If an erosion-control blanket is in place, most particles never detach. Runoff that does form moves downslope and encounters contour fiber rolls, which slow velocity and drop coarser sediment. Water that passes the fiber rolls reaches a perimeter silt fence, which filters finer particles. Any flow that overtops the fence enters a sediment trap or basin, where it settles before reaching the discharge point. Inlet protection at any storm drain along the path catches what the basin misses.
Each control in that sequence handles a smaller, cleaner load than it would if it were the only BMP on site. That’s why treatment-train designs outperform single-BMP strategies, and why inspectors look for the full sequence, not just a silt fence at the boundary.
Sequencing priorities for site phasing:
-
Install perimeter controls and stabilized exits before any grading begins in a new phase
-
Limit the disturbed area to what can be actively worked and stabilized within the permit’s stabilization window
-
Protect stockpiles with perimeter controls and cover or seed the top surface if the pile will sit for more than a few days
-
Preserve existing vegetation buffers at the site boundary as long as possible before clearing
How often should you inspect, and what should you check?
You should inspect at the frequency of your applicable permit. Usually, every 14 days and following storms. Fix routine issues immediately. Complete repairs requiring replacement. That cadence is what the CGP and state permits like OKR10 are built around, and it’s the rhythm that keeps corrective actions from compounding into enforcement actions.
Start every inspection at the lowest discharge point and work uphill. That sequence finds root causes faster because you can trace sediment deposits back to their source rather than discovering a failed BMP at the top of the slope after the damage has already reached the discharge point.
Ordered inspection checklist
-
Check discharge points and receiving waters for visible sediment or discoloration
-
Inspect sediment traps and basins: measure sediment depth, check outlet structures and riprap
-
Walk the perimeter silt fence or fiber rolls: look for undermining, overtopping, sediment at half-height, and flanking at ends
-
Check all storm drain inlet protection devices: sediment accumulation, structural integrity
-
Inspect slopes and blankets: staple pullout, edge lifting, bare spots, rill formation
-
Check stockpiles: perimeter controls intact, top surface covered or seeded
-
Inspect stabilized construction exits: aggregate depth, track-out on adjacent pavement
-
Review stabilization status of all disturbed areas against the SWP3 schedule
-
Record findings, corrective actions, and photo references in the signed inspection log
Post-storm priorities:
-
Walk the site within 24 hours of a storm event of 0.5 inches or more
-
Prioritize inlet protection and perimeter controls first, since those are most likely to have failed under concentrated flow
-
Note any areas where sediment reached the discharge point and document the corrective action taken
Pro Tip: Assign a single person as the qualified inspector for each phase. Rotating inspectors without a formal handoff creates gaps in the log that look like missed inspections to a regulator, even when the site was actually checked.
What do permits actually require, and where do sites commonly fail?
Permits and guidance under the NPDES program require timely maintenance, documented inspections, and treatment-train designs. Noncompliance most often arises from poor documentation and delayed repairs, not from a complete absence of BMPs.
Requirements can also vary by municipality, so contractors need to account for both state permit requirements and local standards. In the City of Tulsa, construction activities that disturb soil are required to implement and maintain site-specific stormwater BMPs, and Building Permits and Watershed Development Permits that disturb bare earth require an erosion and sediment control plan. Sites disturbing one acre or more, including smaller sites that are part of a larger common plan of development exceeding one acre, also require OKR10 coverage and an SWP3 submitted for City review.
The CGP specifies natural buffer requirements of 50 feet where applicable from surface waters, with alternatives allowed when infeasibility is documented in the SWP3. Missing that documentation is a frequent enforcement finding. Similarly, OKR10 requires qualified personnel for inspections and defines corrective action timelines that must be tracked in the permit record.
EPA guidance for municipal inspection programs recommends that inspectors prioritize sites based on risk factors including slope, proximity to sensitive waters, and rainfall erosivity. High-priority sites get more frequent inspections, which means your documentation needs to be current at all times, not just before a scheduled review.
The cost case for proactive maintenance: Emergency repairs after a storm event, including sediment removal from receiving waters, BMP replacement, and potential fines, routinely cost several times more than the routine maintenance that would have prevented the failure. Clogged inlet protection and half-full silt fences are inexpensive to fix on a Tuesday; they’re expensive to explain on a Friday after a two-inch rain.
Common compliance traps to avoid:
-
Failing to stabilize within the permit’s required timeframe after grading pauses
-
Missing or unsigned inspection log entries (a blank date reads as a missed inspection)
-
No documentation of why a buffer was infeasible and what compensatory controls were used
-
Inlet protection left in place after final stabilization, causing drainage problems
-
Sediment accumulation beyond the half-height threshold before cleaning
Proactive maintenance checklist tied to permit deadlines:
-
Initiate routine repairs (staple replacement, minor sediment removal) immediately upon identification
-
Complete non-routine replacements (failed silt fence sections, collapsed inlet protection)
-
Update the SWP3 corrective action log within 24 hours of identifying a deficiency
What does erosion control cost, and how do you estimate a site budget?
Cost varies mainly by disturbed acreage, slope steepness, soil type, site access, and whether controls are temporary or permanent. Those five factors drive more price variation than any regional material cost difference, which is why national per-unit averages are rarely useful for project-level budgeting.
Key cost drivers and how they scale:
-
Disturbed area: More acres mean more linear feet of perimeter control, more blanket coverage, and more inspection time. Temporary BMP costs scale roughly linearly with acreage.
-
Slope: Steeper slopes require heavier blankets, closer fiber roll spacing, and more anchoring labor. A 2:1 slope costs meaningfully more to protect than a 4:1 slope of the same area.
-
Soil type: Highly erodible soils (fine sands, silts, dispersive clays) require more intensive controls and faster stabilization, adding both material and labor cost.
-
Site access: Remote or constrained sites increase mobilization cost and may require smaller equipment, which raises labor hours per unit installed.
-
Temporary vs. permanent: Temporary BMPs require removal and disposal at project completion. Permanent controls (TRMs, vegetated channels, outlet structures) carry higher upfront cost but no removal cost.
-
Inspection frequency: Standard sites generally require inspections every 14 calendar days and following qualifying storm events, with more frequent inspections required for certain high priority sites.
For a rough estimate, start with a per-acre baseline for temporary BMPs appropriate to your soil type and slope, add a slope premium for areas steeper than 3:1, and factor in mobilization and access conditions. Permitting fees, SWP3 preparation, and inspection costs are separate line items that belong in the budget from day one, not as contingency.
When should you hire a specialized erosion-control contractor?
Hire when site complexity, permit risk, or schedule makes in-house installation impractical, or when you need turnkey SWP3 implementation and inspection documentation. The decision point is usually one of four conditions: steep slopes requiring engineered controls, regulated buffers near sensitive waters, multiple discharge points with complex routing, or a high-rainfall-erosivity location where installation timing is critical.
When evaluating contractors, ask for proof of CPESC, CESSWI, or completion of the EPA’s construction inspection training course, which covers the minimum training topics listed in Part 6.3 of the CGP. Also confirm general liability and pollution liability insurance, bonding, and references from projects of similar scale and permit complexity.
In your RFP or bid call, ask contractors to describe their turnaround time for post-storm repairs, how they format inspection reports for SWP3 compliance, whether they provide photo documentation with each inspection, and whether their installation warranty covers failure due to storm events within the first 30 days. A contractor who can’t answer those questions clearly is unlikely to hold up under a regulatory inspection.
Understanding how compliance obligations interact with contract scope is also worth reviewing before finalizing the erosion-control scope in your contract documents.
Bret Barnhart’s take on what actually works in the field
The sites that stay compliant aren’t the ones with the most BMPs. They’re the ones where the crew understands the sequence: stabilize the slope before you worry about the fence at the bottom. At Barnhart Excavating, with over 80 years of earthwork experience across Oklahoma and the surrounding region, that principle shapes how we approach every grading and earthwork project from day one.
What we see consistently is that documentation failures create more enforcement exposure than BMP failures. A silt fence that blew out in a storm and was repaired the next morning is a maintenance success if it’s in the log. The same failure with no log entry looks like abandonment to a regulator. Thorough, timely documentation is as much a part of the work as the installation itself.
Barnhart Excavating handles the full erosion-control scope

For mid-to-large commercial projects where permit risk is real and the schedule is tight, Barnhart Excavating delivers turnkey erosion-control installation, inspection reporting, and documentation. With four generations of earthwork experience in Oklahoma, the team handles site grading, stabilized construction exits, sediment basin excavation, and the ongoing inspection documentation your permit requires. Every scope is built around the treatment-train approach described in this guide, so your controls work together from day one rather than being added reactively after a storm event.
If you’re ready to get a compliant site started on the right footing, request a quote for earthwork and site stabilization services from Barnhart Excavating today.
Sources
The sources below are the primary federal and state references cited throughout this guide.
-
National Pollutant Discharge Elimination System (NPDES) Construction General Permit (CGP)
-
OPDES Permit OKR10 for Stormwater Discharges Associated with Construction Activities
FAQ
What is erosion control during construction?
Erosion control during construction means preventing soil particles from detaching and moving off-site through stabilization measures like seeding, mulching, and erosion-control blankets. It is the primary line of defense in a SWP3, applied before sediment controls.
What is the best method for erosion control on a construction site?
No single method is best for every site. The most effective approach combines erosion-prevention BMPs (vegetation, blankets, mulch) with sediment controls (silt fences, fiber rolls, inlet protection) in a treatment-train sequence tied to your SWP3 and permit requirements.
How much does erosion control cost on a construction project?
Cost depends primarily on disturbed acreage, slope steepness, soil erodibility, site access, and whether controls are temporary or permanent. National per-unit averages are rarely reliable; budget using a per-acre baseline for temporary BMPs plus slope and access premiums specific to your site.
What are the main ways to control erosion on a construction site?
The core methods are temporary seeding, hydroseeding, straw mulch, erosion-control blankets, turf reinforcement mats, silt fences, fiber rolls, inlet protection, sediment traps and basins, and stabilized construction exits. The CGP and state permits like OKR10 require these to be documented in the SWP3 and maintained throughout the project.